The RHUL Observatory
Introduction for Users

|
The RHUL Observatory
Introduction for Users |
|
This document covers the basic information needed by students who will be using the RHUL observatory for project work. It should be read and understood before you begin working with the telescope and other equipment in the dome.
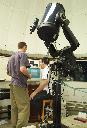
The telescope is a Meade LX200, a Schmidt-Cassegrain with a 12-inch primary mirror. It was acquired in 2005 and replaces the 10-inch LX200 that we had used since 1995. There is a copy of the manual in the dome and it is also available online.
If you point the telescope down you can look in the tube and see the important parts: light goes through the thin lens (Schmidt corrector plate), reflects off the spherical primary mirror in back, the hyperbolic secondary mirror in front and then goes down the hole in the middle of the primary mirror. The purpose of the Schmidt corrector plate is to correct for the spherical aberration of the primary mirror.
Please do not touch the corrector plate! It might look like it has dust on it but this is not really a problem. Finger prints, on the other hand, are much worse, and the lens is delicate.
The "Cassegrain" part of Schmidt-Cassegrain refers to using a secondary mirror to send the light back down a hole in the primary to the Cassegrain focus. The light travels through the tube (around 600 mm long) three times so naively one would think the focal length would be around 1800 mm. In fact it is 3048 cm. This is because the secondary mirror is not flat but rather a hyperboloid, so the rays coming from it are spread apart leading to a longer effective focal length. The diameter of the mirror is 12 inches or 304.8 mm, so the focal ratio is f/10.
The diffraction limit to the angular resolution is about 0.4 arc seconds. In fact the limit from atmospheric effects is more like 1 to 2 arc seconds, so the large size does not really improve our angular resolution over, say, a 5 inch mirror. The main advantage of the large aperture is that it collects more light.
The telescope is equatorially mounted. The axis of the fork points north and its angle with respect to the horizontal is equal to the local latitude of 51.43 degrees (51 degrees 26 minutes), i.e., the fork is parallel to the earth's axis. This happens to point 0.8 degrees from Polaris. As the earth turns to the east, the telescope turns about the same axis at the same rate but to the west, so that the telescope stays pointing at a fixed direction in space. The polar alignment is very precise; a star will drift in the field of view less than several tenths of an arc-second per minute.
Remove the telescope's plastic cover and lens caps. Place them somewhere clean.
Open the dome by unscrewing the nut holding the doors together and sliding open the doors. If the doors stick, make sure the blue cords are not caught and/or use the long pole to gently nudge them open. When rotating the dome, it's best to keep an eye on the blue cords to make sure they don't get caught anywhere.
Power to the computer and the telescope is connected to the mains outlets under the desk. Turn on the mains and also the power switch on the telescope. After a short initialization time you will see a message scrolling across the screen warning you not to point the telescope at the sun. Enter the number prompted by the message. The display screen should read "Align: one star". You can then use the hand paddle to move the telescope around with the four arrow keys. "Up" moves the telescope's declination towards celestial North, "down" to the South, "left" changes the right ascension to the East and "right" to the West.
IMPORTANT: Do not attempt to move the telescope manually when the motor gears are engaged; this will damage the gears. Generally you should only use the hand paddle to slew the telescope. If you need to move it by hand you must first disengage the gears (see manual to find the declination and right-ascension locks).
Insert an eyepiece into the telescope and tighten the set-screw. Never overtighten any of the screws on the telescope; firmly finger-tight is sufficient. Practice pointing the telescope at some bright objects such as the moon. Start with a lower power eyepiece (e.g. 32 mm). First find the object in the finder scope and centre it in the cross hairs. You should then be able to see it through the eyepiece.
To first get a coarse focus, you must first unlock the primary mirror. FAILURE TO DO SO CAN RESULT IN DAMAGE TO THE TELESCOPE! The knobs for the coarse focus and mirror lock are both on the rear of the telescope (see manual for exact location). This actually moves the primary mirror in and out. For a finer focus, lock the primary mirror by turning the lock know anticlockwise (don't overtighten) and use the electric focusser from the hand paddle. This is done by pressing the focus key and then using the East/West buttons on the handpaddle to focus in and out. The focus speed can also be adjusted with the up/down arrows.
You can also log into the PC and start up e.g. Internet Explorer, Starry Night, and programs for controlling the CCD cameras.
The LX200GPS manual gives details on use of the Autostar II controller. The relevant information is not always easy to find, but you can take a look at the description of a similar system at NMSU. (One difference between the systems: when we turn on the power, the GPS should work; no need to enter date and time.)
WARNING. If you have a CCD camera or other large device connected to the rear cell of the telescope, there may not be enough clearance to move the telescope to declinations near 90 degrees (i.e., north). The computer will not, of course, know what is mounted on the rear cell, and it may happily crash the device into the fork. You should keep an eye on the scope as it moves. You can stop the scope by pressing the mode key several times. If this does not work (and it may not), be prepared to turn off the telescope's power switch.
We have several CCD cameras that allow you to record images which can be stored on the computer and analyzed. To store the data you should create a folder with the date of your observations, e.g., 8oct05, and you should put this in the appropriate folder on the C drive. If you are a PH2900 student, put it in the PH2900 folder; if you are a project student, create a folder with your name on the C drive. You can then copy the data to a CD or to your Y or W drives, but please also leave a copy on the C drive (as a backup and so others can use it as well).
Our main CCD camera is an ST-7E made by the Santa Barbara Instruments Group (SBIG). It has two CCD chips, which you can see by looking in the front end (other than for quick looks please keep the cap on the camera to keep dust out). The larger chip (6.9 mm x 4.6 mm) is to record the actual image and has 765 x 510 pixels (390,000 total), which are 9 x 9 micron squares. The smaller one is a guide chip which sites on a star in the field of view and sends feedback to the telescope motors to keep it pointing in the same direction over the course of a long exposure (in principle up to an hour).
When light hits one of the pixels of the CCD, electrons are liberated by the photo-electric effect. The probability for a single photon to produce a photo-electron (the quantum efficiency) is around 65% for wavelengths around 600 nm, falling off to around 30% at 400 and 800 nm. This is an order of magnitude better than photographic film. Note that a factor of 10 in quantum efficiency is equivalent to a factor of sqrt(10) in telescope aperture, i.e., a 30 cm mirror with a CCD collects almost as much light as a 1 m mirror with photographic film.
The photo-electrons can be stored in the pixels over long periods of time with very little loss of charge. At the end of an exposure, which can last from 0.1 s to 1 hour, the contents of each pixel are read out row by row into the computer. The number of photo-electrons in each pixel gives a direct measure of the number of photons.
Even in the absence of incoming photons, the pixels will start accumulating electrons (dark current) and since these are indistinguishable from photo-electrons, the dark current is a limiting factor in the camera's ability to detect faint objects. The dark current can be suppressed by about a factor of two for every 5 degree C reduction in temperature, being about 36 electrons per pixel per minute at 0 degrees C. The camera has a thermoelectric cooler and in normal operation we can maintain its temperature at about -20 degrees C.
In addition to the SBIG CCD, there are two cheaper cameras that are in fact more appropriate to use for many of the simipler observations, especially with bright targets such as planets. These are a Meade LPI (Lunar Planetary Imager) and a webcam CCD that has been remounted in an aluminium box with a 1.25 inch tube that can be inserted into the eyepiece holder.
Information on the LPI can be found here. To use the LPI, you connect its USB cable to the PC and start the Autostar Suite program. From there, click "image" and select "LPI Imaging". For further details, see the instructions on the link above.
The webcam CCD is a Logitech QuickCam Pro 3000 with a 3 x 4 mm CCD chip containing 640 x 480 pixels. If you remove the lens cover you can peer in and see the chip. As with the expensive CCD, please don't do this more than for quick looks as we would like to keep the CCD as dust free as possible.
To use the QuickCam CCD, insert it into the eyepiece holder and connect its USB cable to the USB cable lying by the base of the telescope, which is connected to the PC. From the PC's program menu, start "Logitech QuickCam". To adjust the camera's exposure and brightness, click on the `Settings' button and go to `Advanced camera settings'. From there, you can turn on or off the automatic exposure controls and adjust the exposure, brightness, contrast, etc. To take a picture, click on "take picture". And so forth.
When you're done observing, be careful to go through the shutdown checklist carefully. Several of the steps, if missed, could lead to serious damage to the equipment.
How much did it cost? The telescope was around 3600 pounds, the CCD camera about the same. The nu-view spectrometer was 2500. (In the US, replace pounds by dollars but keep the number the same.)
Do we have problems with light pollution? Yes, a lot from the M25. These are high pressure sodium. Incandescent lights are the worst (continuous spectrum cannot be filtered out); mercury is better but it still has many lines all over the spectrum. High pressure sodium is better and low pressure sodium, which gives a very pure yellow, is the best, since its light is concentrated almost entirely in a closely spaced doublet of spectral lines. Fortunately, by using the CCD camera we can subtract the background sky brightness from the images. In principle with a long enough integration time we can get a high signal to noise ratio even with very bad light pollution.
Why is there a red light in the dome? This is for reasons of dark adaptation when making visual observations. There are two things that the eye does to adapt to the dark: the pupil opens up to a diameter of 5 or 6 mm, and the chemical rhodopsin builds up in your retina, which greatly increases the sensitivity to light. Your eye has two types of receptors called rods and cones. Under normal (bright) light levels, most of your vision is with the cones, and the three types of cones provide colour vision. The rods are only active if the rhodopsin molecule is present, and under normal light levels this is broken apart. In the dark, its concentration builds up over a period of a half an hour or so. This gives the rods about a 100 times greater sensitivity than the cones, but no colour information. It turns out that rhodopsin is not destroyed as much by red light, so if you have to see something while you're dark adapted it's best to use red. There's also a night vision mode of the Starry Night software where everything is in red.
Does the telescope vibrate? Hopefully less now that we have filled the steel pier with sand. If you have the QuickCam CCD hooked up, set it in 320 x 240 mode and try tapping on the pier. You can see fairly large movements that take several seconds to damp out.